How to use IIS rather than Jetclouding default Web servers
Pre-requisites
It can be a good idea to Update Jetclouding to be sure that you get the latest Jetclouding programs.
1) Start AdminTool and go to the Web Management Tool
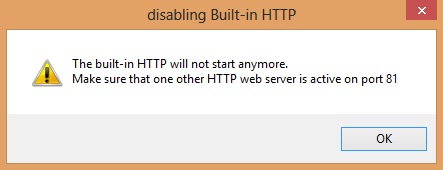
In the Http Web Server tile, check Use a different HTTP web server because you want to use IIS

A pop-up will recommend you to change IIS HTTP port to 81
Then, click on the web folder tile and use the button Select a new Web Server root path to tell Jetclouding where will be the new web folder root.
Jetclouding will copy the requested files/folders into this new root folder and, at this point, the Jetclouding setting for IIS is near completion.
It’s time now to start IIS Manager
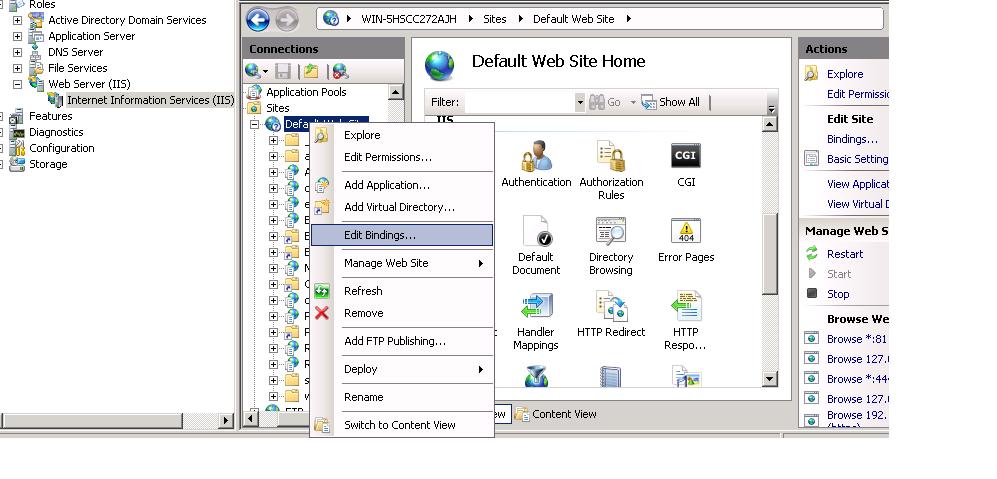
2) IIS Manager
Change the HTTP from 80 to 81 using the Binding function of IIS Manager
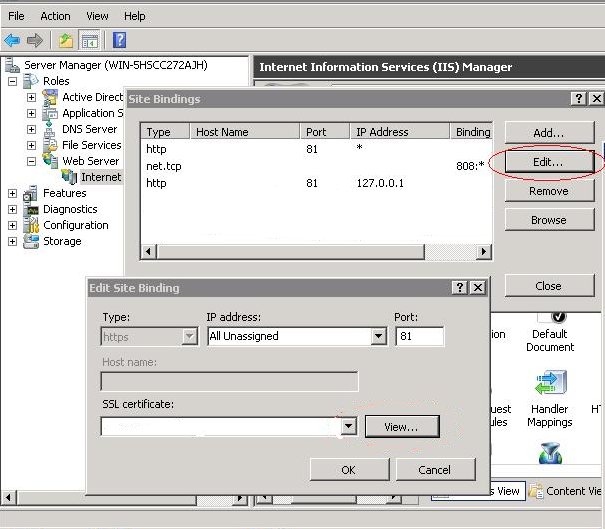
And restart the IIS service.
3) Going back to Jetclouding Web Management tool
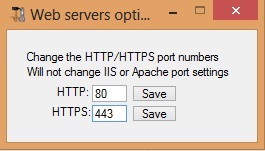
You can set the HTTP and HTTPS ports in Jetclouding Web Management tool. We recommend using standard ports, but this feature can be handy when trying to avoid a conflict with an other process.
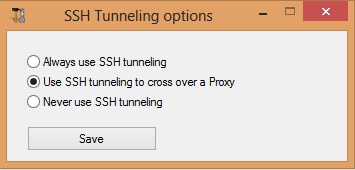
Check Use SSH tunneling to cross over Proxy on the SSH tunneling tile
Restart the Jetclouding web servers
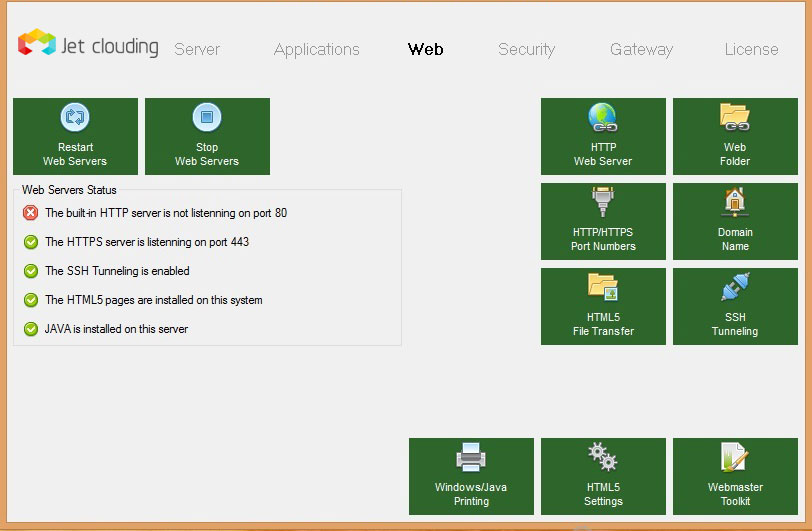
Only HTTP flag will stay in red because it is IIS which is handling it :
4) Last steps
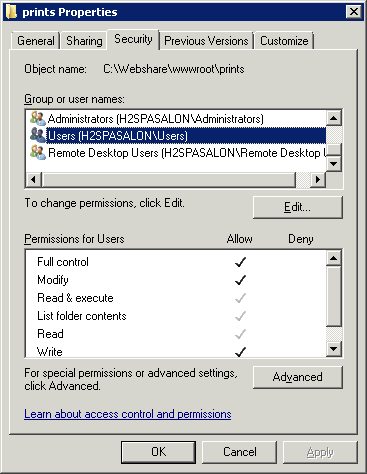
For the Universal Printer, we need to be able to write in the PRINTS folder
So, verify that Everyone/Users… have full rights on …/prints folder
Then select the .html file you wish to use as a Web Access page in
C:\Program Files (x86)\Jetclouding\Clients\www
and copy it as index.html in
C:\inetpub\wwwroot
5) Specific Settings for Jetclouding Gateway Portal, Load Balancing and/or HTML5 file transfer
If you want to use this IIS based system as a Jetclouding Gateway Portal and/or use Jetclouding Gateway Portal Load Balancing feature and/or use HTML5 file transfer feature, you will need to allow the execution of Jetclouding GCI scripts by IIS.
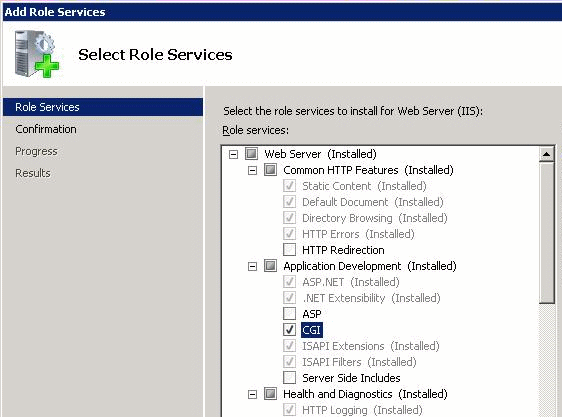
First, you must have the CGI role service enabled in IIS.
Go to the “Server Manager”, then “Roles”, then “Add Role Services”
Once you have CGI role enabled, you can start up the “Internet Information Services (IIS) Manager”.
In the left panel tree, expand the tree under your server, then under “Sites”, and right click on your site in order to add a new “Virtual Directory”:
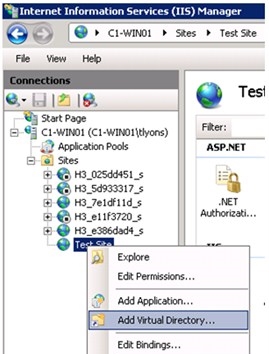
In the “Alias” field, type “cgi-bin”.
In the “Physical path” field, type “C:\Program Files (x86)\Jetclouding\Clients\www\cgi-bin”.
Then click on “OK” and you will see that the nw “cgi-bin” virtual directory has been added to your IIS site.
Right-click on this “cgi-bin” virtual directory and click on “Convert to Application”. Click “OK” and accept the default settings.
Now select the “Handler Mappings” icon for this folder on the right hand side of the Manager window. Click on the “Add Module Mapping” option on the right hand side.
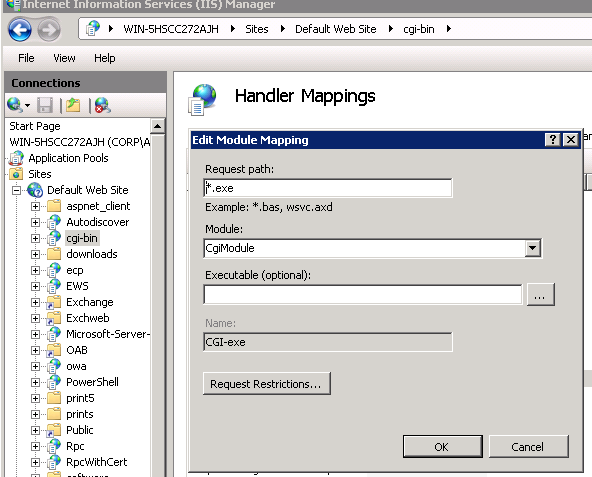
Enter the following settings:
Request path: *.exe
Module: CgiModule
Leave the "Executable" field blank
Name: CGI-exe
Click “OK” to finish adding the module mapping.
Now, the last step is to allow the CGI extension to run on the server. You do this on the “ISAPI and CGI Restrictions” page. This can be found by clicking on the machine name in the tree view to the left-hand side of the window.
On the “ISAPI and CGI Restrictions” page, click on “Add…” on the right hand side of the window. Now specify the full path to the “cp.exe” file hosted in the folder we have configured before. Make sure to check the option to “Allow extension path to execute”.
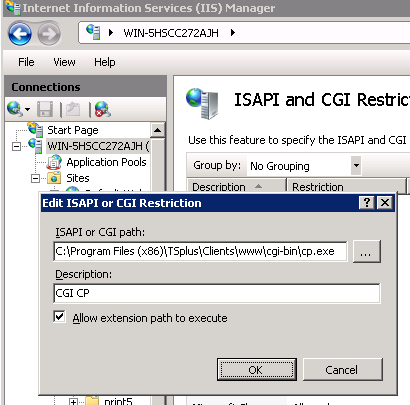
Reproduce this last step for every .exe file in “C:\Program Files (x86)\Jetclouding\Clients\www\cgi-bin”:
- hb.exe
- hb-load.exe
- listfiles.exe
- post.exe
6) Add a Mime-Type in IIS
Launch a Command Prompt as an Administrator, paste the following command and execute it by pressing the “Enter” key:
%SystemRoot%\system32\inetsrv\appcmd set config /section:staticContent /+[fileExtension='.dat',mimeType='text/plain']
7) Test with local host
Warning: Use a different user account.
If you try with your current user account from your own RDP session to the server, then you will be disconnected and not be able to reconnect.


